环境配置
首先到官网下载 OpenCV。
解压后,进入 /build/java 目录,将 jar 包和对应系统版本的 dll 复制到项目中。
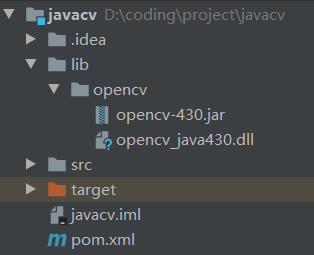
把 jar 包添加到构建路径,然后在 vm 参数中加入 -Djava.library.path=$PROJECT_DIR$\lib\opencv 完成环境配置。
使用 《OpenCV 3.0 Computer Vision with Java》 中的例子来测试环境是否配置成功:
package opencv;

import org.opencv.core.Core;
import org.opencv.core.CvType;
import org.opencv.core.Mat;
import org.opencv.core.Scalar;

/**
 * @author yuan
 * @version 1.0
 * @date 2020/5/11 14:47
 */
public class SimpleSample {
    static {
        System.loadLibrary(Core.NATIVE_LIBRARY_NAME);
    }

    public static void main(String[] args) {
        System.out.println("Welcome to OpenCV " + Core.VERSION);
        Mat m = new Mat(5, 10, CvType.CV_8UC1, new Scalar(0));
        System.out.println("OpenCV Mat: " + m);
        Mat mr1 = m.row(1);
        mr1.setTo(new Scalar(1));
        Mat mc5 = m.col(5);
        mc5.setTo(new Scalar(5));
        System.out.println("OpenCV Mat data:\n" + m.dump());
    }
}
运行结果:
Welcome to OpenCV 4.3.0
OpenCV Mat: Mat [ 5*10*CV_8UC1, isCont=true, isSubmat=false, nativeObj=0x1410e70, dataAddr=0x1470080 ]
OpenCV Mat data:
[  0,   0,   0,   0,   0,   5,   0,   0,   0,   0;
   1,   1,   1,   1,   1,   5,   1,   1,   1,   1;
   0,   0,   0,   0,   0,   5,   0,   0,   0,   0;
   0,   0,   0,   0,   0,   5,   0,   0,   0,   0;
   0,   0,   0,   0,   0,   5,   0,   0,   0,   0]
说明环境配置成功。
图片读取
使用 Imgcodecs.imread(String fileName) 或 Imgcodecs.imread(String fileName, int readMod) 即可完成图片读取。
public class ImageRead {
    private static final String IMAGE_PATH = "D:/test/Amiya.jpg";

    static {
        System.loadLibrary(Core.NATIVE_LIBRARY_NAME);
    }

    public static void main(String[] args) {
        // 读取灰度图
        Mat amiya = Imgcodecs.imread(IMAGE_PATH, Imgcodecs.IMREAD_GRAYSCALE);
        System.out.println(amiya.width());
        System.out.println(amiya.height());
    }
}
查看 Imgcodecs 的源码可知,读取模式有这些:
// C++: enum ImreadModes
public static final int
            IMREAD_UNCHANGED = -1,
            IMREAD_GRAYSCALE = 0,
            IMREAD_COLOR = 1,
            IMREAD_ANYDEPTH = 2,
            IMREAD_ANYCOLOR = 4,
            IMREAD_LOAD_GDAL = 8,
            IMREAD_REDUCED_GRAYSCALE_2 = 16,
            IMREAD_REDUCED_COLOR_2 = 17,
            IMREAD_REDUCED_GRAYSCALE_4 = 32,
            IMREAD_REDUCED_COLOR_4 = 33,
            IMREAD_REDUCED_GRAYSCALE_8 = 64,
            IMREAD_REDUCED_COLOR_8 = 65,
            IMREAD_IGNORE_ORIENTATION = 128;
看起来和 python 中的 cv2 库差不多。
图片展示
旧版本的 OpenCV 没有为 java 提供图片展示功能,新版本可以使用 HighGui.imshow 来展示图片,调用 imshow 后必须使用 HighGui.waitKey 进行阻塞。
我们也可以用 swing 自己写一个图片展示器。
《OpenCV 3.0 Computer Vision with Java》 中提供了一个 ImageViewer 类,对它稍加改造:
package utils;

import org.opencv.core.Mat;

import javax.swing.*;
import java.awt.*;
import java.awt.image.BufferedImage;
import java.awt.image.DataBufferByte;

/**
 * @author yuan
 * @version 1.0
 * @date 2020/5/11 16:18
 */
public class ImageViewer {
    private JLabel imageView;
    private JFrame windowFrame;

    public ImageViewer(Mat image, String windowName) {
        setSystemLookAndFeel();
        createJFrame(image, windowName);
    }

    public ImageViewer(Mat image, String windowName, boolean show) {
        this(image, windowName);
        if (show) {
            this.show();
        }
    }

    public void show() {
        this.windowFrame.setVisible(true);
    }

    public void hide() {
        this.windowFrame.setVisible(false);
    }

    private void createJFrame(Mat image, String windowName) {
        this.imageView = new JLabel();
        this.windowFrame = new JFrame(windowName);
        this.windowFrame.add(this.imageView, BorderLayout.CENTER);
        this.windowFrame.setDefaultCloseOperation(WindowConstants.EXIT_ON_CLOSE);
        Image loadedImage = toBufferedImage(image);
        this.imageView.setIcon(new ImageIcon(loadedImage));
        this.windowFrame.pack();
        this.windowFrame.setLocationRelativeTo(null);
    }

    private void setSystemLookAndFeel() {
        try {
            UIManager.setLookAndFeel
                    (UIManager.getSystemLookAndFeelClassName());
        } catch (ClassNotFoundException e) {
            e.printStackTrace();
        } catch (InstantiationException e) {
            e.printStackTrace();
        } catch (IllegalAccessException e) {
            e.printStackTrace();
        } catch (UnsupportedLookAndFeelException e) {
            e.printStackTrace();
        }
    }

    public Image toBufferedImage(Mat matrix) {
        int type = BufferedImage.TYPE_BYTE_GRAY;
        if (matrix.channels() > 1) {
            type = BufferedImage.TYPE_3BYTE_BGR;
        }
        int bufferSize = matrix.channels() * matrix.cols() * matrix.rows();
        byte[] buffer = new byte[bufferSize];
        matrix.get(0, 0, buffer);
        BufferedImage image = new BufferedImage(matrix.cols(), matrix.
                rows(), type);
        final byte[] targetPixels = ((DataBufferByte) image.getRaster().
                getDataBuffer()).getData();
        System.arraycopy(buffer, 0, targetPixels, 0, buffer.length);
        return image;
    }
}
测试:
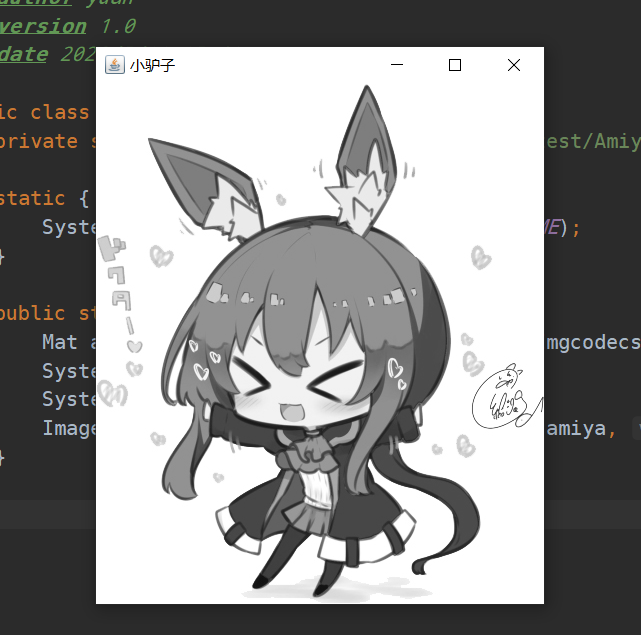
ImageViewer imageViewer = new ImageViewer(amiya, "小驴子", true);运行结果: